Buggy maintenance or service


  • Why maintenance ?
    For a longer life of your buggy. Sand, dust, water or seawater gets every where. Then corrosion (rust) starts. Or the sand prevents that bolts and nuts fit or ball-bearings turn. Seawater makes bolts and nuts to give off 'black' on your hands and clothes. Sand and water also gets inside of the ball-bearings.
  • How often is maintenace required ?
    Clean the frame and seat every time you have driven on the beach or on some other wet/muddy area.
    Clean and grease (or oil) the bolts and nuts every time you dis-assemble your buggy for transport.
    Ball-bearings should be cleaned and greased once (1x) a year after the buggy season, or twice (2x) a year if you drive every weekend. If you only drive on clean and dry area's then you probably will never need to clean the ball-bearings.
  • Which grease, degreasing agent and oil can be used?
    Go to your local bicycle, motor or automotive spare parts shop. They have the right stuff. Ask for grease for ball-bearings !! I had to buy all (at Decathlon) during my holiday in France. The ball-bearings in the downtube where stuck. In the process of cleaning, during my holiday, I destroyed 1 ball-bearing as I found out while I was making the foto's for this page. So I will replace both (not one).
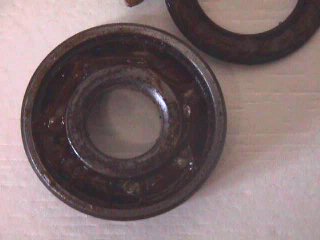
Click on the text.
Doesn't it work ???
Update the browser to version 4.0 or more.
Required tools for removing
Removing the ball-bearing
Ball-bearing and spacer
Grease, degreasing agent and oil
Removing the dust cap 1 , 2 , 3 and , 4
Clean degreasing agent
Ball-bearing close-up
Clean ball-bearing
New greased ball-bearing
Put caps in place 1 and 2
The foto's demonstrate the cleaning of one (1) ball-bearing from the downtube. The procedure is the same for all ball-bearings. The ball-bearings may differ from wheel to wheel and to down tube. So clean every ball-bearing seperatly !!
  1. How the clean one ball-bearing:
  2. Remove the ball-bearings from the downtube with a rubber hamer and a pen.
    Make sure the pen is with it's flat end on the inner ring of the ball-bearing and NOT on the dust cap of the bearing. Otherwise you will destroy the ball-bearing when you hit the pen with the rubber hammer.
  3. There is always a spacer between the 2 ball-bearings in the downtube or wheel.
    Don't forget to clean it and to put it back when re-assembling.
  4. Remove the dust caps from the ball-bearing with a knife. The foto's show that the knife goes under the dust cap at the inner ring of the ball-bearing. There are also ball-bearings where you can get only under the dust cap at the outer ring of the ball-bearing. So be cautious and don't destroy the dust cap.
  5. Put the seperated dust caps and ball-bearing (1 !!) in a degreasing agent (gas-oil or turpentine) and move them around with a brush. Then dry caps and ball-bearing. I found sand in the durty degreasing agent !!. This means: use new degreasing agent for the next ball-bearing.
  6. Put new and excessive (MUCHO) grease in the ball-bearing. Then put the dust caps in place. You will feel that they 'click' in place.
  7. Test turn the ball-bearing. If it turns or rolls rough, un-smooth, rugged, with resistance then replace the ball-bearing with a new one. Replace the both for that wheel or downtube, not just one.
  8. Re-assemble the downtube or wheel when both ball-bearings are cleaned or re-newed. Use the rubber hammer to put the ball-bearings in again. Do NOT forget the spacer.